Inverter Circuit For Soldering Iron

Here is a simple but inexpensive inverter for a small soldering iron (25W, 35W, etc) In the absence of mains supply. It uses eight transistors and a few resistors and capacitors. Transistors Q1 and Q2 (each BC547) form an astable multivibrator that produces 50Hz signal. The complementary outputs from the collectors of transistors Q1 and Q2 are fed to pnp Darlington driver stages formed by transistor pairs Q3-Q5 and Q4-Q6 (utilising BC558 and BD140).

The outputs from the drivers are fed to transistors Q7 and Q8 (each 2N3055) connected for push-pull operation. Use suitable heat-sinks for transistors Q5 through Q8. A 230V AC primary to 12V-0-12V, 4.5A secondary transformer (T1) is used. The centre-tapped terminal of the secondary of the transformer is connected to the battery (12V, 7Ah), while the other two terminals of the secondary are connected to the collectors of power transistors T7 and T8, respectively.

When you power the circuit using switch S1, transformer X1 produces 230V AC at its primary terminal. This voltage can be used to heat your soldering iron. Assemble the circuit on a generalpurpose PCB and house in a suitable cabinet. Connect the battery and transformer with suitable current-carrying wires. On the front panel of the box, fit power switch S1 and a 3-pin socket for connecting the soldering iron. Note that the ratings of the battery, transistors T7 and T8, and transformer may vary as these all depend on the load (soldering iron).

Circuit diagram:

Inverter Schematic For Soldering Iron

Inverter Circuit Diagram For Soldering Iron

Bicycle Back Safety Light

Flashing 13 LED unit, 3V supply, Also suitable for jogger/walkers
This circuit has been designed to provide a clearly visible light, formed by 13 high efficiency flashing LEDs arranged in a pseudo-rotating order. Due to low voltage, low drain battery operation and small size, the device is suitable for mounting on bicycles as a back light, or to put on by jogger/walkers. IC1 is a CMos version of the 555 IC wired as an astable multivibrator generating a 50% duty-cycle square wave at about 4Hz frequency.

At 3V supply, 555 output (pin 3) sinking current operation is far better than sourcing, then LEDs D1-D6 are connected to the positive supply rail. In order to obtain an alternate flashing operation, a second 555 IC is provided, acting as a trigger plus inverter and driving LEDs D7-D12. D13 is permanently on. The LEDs are arranged in a two series display as shown below, with a center LED permanently on. This arrangement and the alternate flashing of the two series of LEDs provide a pseudo-rotating appearance.

Circuit diagram:
safety led schematic

Bicycle Back Safety Light Schematic Circuit Diagram

Fading Leds

Two strips of LEDs fading in a complementary manner, 9V Battery-operated portable unit

This circuit operates two LED strips in pulsing mode, i.e. one LED strip goes from off state, lights up gradually, then dims gradually, etc. while the other LED strip does the contrary. Each strip can be made up from 2 to 5 LEDs at 9V supply. The two Op-Amps contained into IC1 form a triangular wave generator. The rising and falling voltage obtained at pin #7 of IC1 drives two complementary circuits formed by a 10mA constant current source (Q1, Q2 and Q5, Q6) and driver transistor (Q3 and Q6). R4, R5 & C1 are the timing components: the total period can be varied changing their values. R7 & R8 vary the LEDs brightness.

Circuit diagram:
Fading Leds Schematic

Fading Leds Circuit Diagram

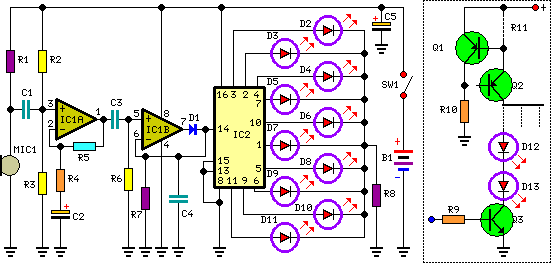
Dancing LEDs

LED sequencer: follows the rhythm of music or speech, 9V Battery-operated portable unit
The basic circuit illuminates up to ten LEDs in sequence, following the rhythm of music or speech picked-up by a small microphone. The expanded version can drive up to ten strips, formed by up to five LEDs each, at 9V supply. IC1A amplifies about 100 times the audio signal picked-up by the microphone and drives IC1B acting as peak-voltage detector. Its output peaks are synchronous with the peaks of the input signal and clock IC2, a ring decade counter capable of driving up to ten LEDs in sequence.

An additional circuit allows the driving of up to ten strips, made up by five LEDs each (max.), at 9V supply. It is formed by a 10mA constant current source (Q1 & Q2) common to all LED strips and by a switching transistor (Q3), driving a strip obtained from 2 to 5 series-connected LEDs. Therefore one transistor and its Base resistor are required to drive each of the strips used.

Circuit diagram:
Dancing LEDs IC 4017
Dancing LEDs Circuit Diagram

5V Regulated Power Supply

This circuit is a small +5V power supply, which is useful when experimenting with digital electronics. Small inexpensive wall tranformers with variable output voltage are available from any electronics shop and supermarket. Those transformers are easily available, but usually their voltage regulation is very poor, which makes then not very usable for digital circuit experimenter unless a better regulation can be achieved in some way.

The following circuit is the answer to the problem. This circuit can give +5V output at about 150 mA current, but it can be increased to 1 A when good cooling is added to 7805 regulator chip. The circuit has overload and thermal protection. The capacitors must have enough high voltage rating to safely handle the input voltage feed to circuit. The circuit is very easy to build for example into a piece of veroboard.


Circuit diagram:
5V Regulated Power Supply Circuit

5 Volt DC Power Supply Circuit Diagram

100W Inverter

Here is a 100 Watt inverter circuit using minimum number of components. I think it is quite difficult to make a decent one like this with further less components.Here we use CD 4047 IC from Texas Instruments for generating the 100 Hz pulses and four 2N3055 transistors for driving the load. The IC1 Cd4047 wired as an astable multivibrator produces two 180 degree out of phase 100 Hz pulse trains.

These pulse trains are preamplified by the two TIP122 transistors.The out puts of the TIP 122 transistors are amplified by four 2N3055 transistors (two transistors for each half cycle) to drive the inverter transformer.The 220V AC will be available at the secondary of the transformer. Nothing complex just the elementary inverter principle and the circuit works great for small loads like a few bulbs or fans.If you need just a low cost inverter in the region of 100 W, then this is the best.

Circuit diagram:

100 Watt Inverter Circuit Diagram

60 Watt Audio Power Amplifier

This project shows you how to build high quality 60 - 90W (into 4 Ohm load) powerful Amplifier. It suits for guitar or bass amplifier

To celebrate the hundredth design posted to this website, and to fulfil the requests of many correspondents wanting an amplifier more powerful than the 25W MosFet, a 60 - 90W High Quality power amplifier design is presented here. Circuit topology is about the same of the above mentioned amplifier, but the extremely rugged IRFP240 and IRFP9240 MosFet devices are used as the output pair, and well renowned high voltage Motorola's transistors are employed in the preceding stages.

The supply rails voltage was kept prudentially at the rather low value of + and - 40V. For those wishing to experiment, the supply rails voltage could be raised to + and - 50V maximum, allowing the amplifier to approach the 100W into 8 Ohm target: enjoy! A matching, discrete components, Modular Preamplifier design is available here: Modular Audio Preamplifier.

Automatic Low-Power Emergancy Light

Here is portable, simple and inexpensive unit white-LED-based emergency light that offers the following advantages. 1-It is highly bright due to the use of white LEDs. 2-The light turns on automatically when mains supply fails, and turns off when mains power resumes. 3-It has its own battery charger. When the battery is fully charged, charging stops automatically. The charger power supply section is built around 3-terminal adjustable regulator IC LM317 (IC1), while the LED driver section is built around transistor BD140 (Q2).

In the charger power supply section, an input AC main is stepped down by T1 to deliver 9V, 500mA to the bridge rectifier, which comprises diodes D1 through D4. Filter capacitor C1 eliminates ripples. Unregulated DC voltage is fed to input pin 3 of IC1 and provides charging current through D5 and limiting resistor R15. By adjusting preset P1, the output voltage can be adjusted to deliver the required charging current. When the battery gets charged to 6.8V, D6 conducts and charging current from IC1 finds a path throughQT1 to ground and it stops charging of the battery. When mains power is available, the base of Q2 remains high and Q2 does not conduct. Thus LEDs are off.

Flashing-LED Battery-status Indicator

Flashing-LED Battery-status Indicator will signals when an on-circuit battery is exhausted. It works with 5V to 12V operating voltage

A Battery-status Indicator circuit can be useful, mainly to monitor portable Test-gear instruments and similar devices. LED D1 flashes to attire the user's attention, signaling that the circuit is running, so it will not be left on by mistake. The circuit generates about two LED flashes per second, but the mean current drawing will be about 200µA. Transistors Q1 and Q2 are wired as an uncommon complementary astable multivibrator: both are off 99% of the time, saturating only when the LED illuminates, thus contributing to keep very low current consumption.

Circuit operation:

The circuit will work with battery supply voltages in the 5 - 12V range and the LED flashing can be stopped at the desired battery voltage (comprised in the 4.8 - 9V value) by adjusting Trimmer R4. This range can be modified by changing R3 and/or R4 value slightly. When the battery voltage approaches the exhausting value, the LED flashing frequency will fall suddenly to alert the user. Obviously, when the battery voltage has fallen below this value, the LED will remain permanently off. To keep stable the exhausting voltage value, diode D1 was added to compensate Q1 Base-Emitter junction changes in temperature. The use of a Schottky-barrier device (e.g. BAT46, 1N5819 and the like) for D1 is mandatory: the circuit will not work if a common silicon diode like the 1N4148 is used in its place.

Circuit diagram:
Flashing-LED Battery-status Indicator Schematic

Flashing-LED Battery-status Indicator Circuit Diagram